Sunday, April 26, 2015

Guest Designer for Pink and Main!!

Hello my crafty friends!  I'm back - easing my way into crafting again!
How thrilled I was to be accepted as a Guest Designer for the Pink and Main blog

Please go check them out and be sure to stop in their store - what adorable stamps they

have!


I was sent two sweet stamp sets to design with.  Let's start with this CUTE set called 
"Chews You"!  


When I saw this little cutie on this set, I knew I just HAD to create something with her!

Let's take a look at my card and then I'll give you a few details!


I decided to create a card using the little girl who has blown a big bubble from her bubble gum
and it looks like it POPPED on her!   Ohhh, how I remember having that happen a million times when I was young.  
(Yes, I CAN remember --- no, it wasn't THAT long ago thank you very much!!)
I loved the sentiment stamp - You Blow me away!  It is especially fun because you can color in the word BLOW!  

I used my Cuttle Bug to create a background full of dots and then layered my main image on
a design cut from my Cricut to make her stand out.  I not only layered the little girl, but then 
also popped up the entire background she is on as well!
How I love dimension in my projects! 

Here's another look at my completed card!


Here is a link to this adorable stamp set in the Pink and Main Store:


For my next two projects - - I used the super beautiful stamp set called "Inspire".
Ohhh, how pretty are the butterflies on this set! 


I made my first card from this set using the 3 butterflies on the top left side of the stamp set. 


I stamped each image on to cardstock that was similar in color to the inks I used.
Inked the edges to make them Pop a little.
I cut simple strips of paper and layered them with a very thin ribbon.


I used foam layering squares to pop up those squares with the butterflies to really
make them the focal points.
Added a "diamond gem" to the strips to give a little bling!


I cut out a cute butterfly shape to place my sentiment from this set inside my card


And that completed project #2!

You can find this set at the Pink and Main store right here:


And for my final project today - one more design from the same "Inspire Set".  You can make SO many things out of the sets from Pink and Main!
I created another card using the largest image in this set.


I love how it has the pretty font repeated over and over on the entire butterfly!
It says "Spread Your Wings".
I played around with many different colors of ink and finally settled on this one.

Again, because I love dimension - I folded the wings up and gave them a little bit of a curved shape before gluing it onto my card base.


I added some Liquid Pearls trailing behind the butterfly as it was "flying" across my card front!

I LOVE, LOVE, LOVE the sentiments on this set.  Just love the font they chose!  
Here's just a couple more views of this card:


THANK YOU so much for stopping by to visit!  Please head over to the Pink and Main blog to check out all the projects their very talented designers have created with their wonderful, well made stamps!

You know how I love to read your comments! Especially after my Hiatus from crafting!
Thanks for visiting!  


Wednesday, April 1, 2015

HELLO, HELLO, HELLO!!
My goodness - it's been a VERY long time since I've posted.  To make a long story short - -
I had some health issues that kept repeating and finally ended up with a pretty serious surgery
at the end of October 2014.  I'm happy to report I am doing MUCH MUCH Better - but really have not been doing a lot of crafting.
I finally did a couple of projects yesterday - - it was a full day of crafting for me, actually!
I stepped out of my normal "realm" of paper crafting for my first project and made a
 FLORAL ARRANGEMENT!   WHAT???  I have not done anything like that for years and it was actually fun!  A sweet friend of mine is hosting Easter for her large family and she's had a lot going on in her life lately - so I thought she might like a flower arrangement for her table. I knew her
color scheme since I helped her do some Easter shopping - so from there I went!

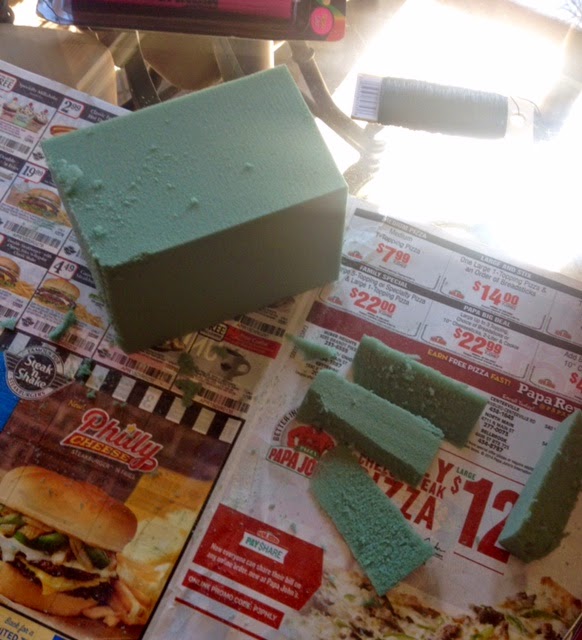
First I gathered my materials:  Dry floral foam, silk flowers, wire cutters, wire, a basket.
Trim floral foam to fit your container - in my case, the basket.

Filled in the foam as best I could!
Select the flowers you wish to use, trim if in bushes.
Wire smaller pieces to floral wire.
Have an adorable cat help you!


Fill in flowers as desired til it looks good
(or in my case, you run out of flowers!)

Hope your friend loves the arrangement!  I was lucky that she says she Loves it!  Thank you Sheryl!

Then, my friend arrived at my house to make some "goodie bags" for her guests to take home after her Easter dinner. We settled on making cute tags for each of the bags -  and then made a couple of "bunnies" to sit on her dessert table!  Simple crafts, using the Cricut!  We made 30 tags - so it did take some time to hand decorate each one!

Considering I've not done much crafting in the past year or so - it was a wonderful full day of crafting and it FELT GOOD!  I hope I get my "mojo" back and continue creating!
Thanks for checking in - I've missed you all!
Have a wonderful, safe and HAPPY EASTER!  And please, SRPING-- please come and stay!


Wednesday, October 2, 2013

A Halloween Card!

#39
Challenge:   Halloween
October 1 - 7th, 2013

Hello Crafters!  
I am here with my Design Team post for the Cuttin' and Stampin' Challenge Blog where the "challenge" for this week is Halloween!
I had the wonderful opportunity to work with the adorable stamp set from Paper Smooches called Halloweenies.  I love the images as well as the sentiments on this cute set!   I was also lucky enough to get to use the Paper Smooches "Wise Dies" set also called "Halloweenies" that tie right in with the stamp set!
As part of the Design Team, I was also given some wonderful Bazzil Paper from the Arsenic and Lace collection!  Tammy has some wonderful specials if you head over to the Shop at the Cuttin' and Stampin' Blog.

Let's take a look at my first project for today.

How cute is that little witch?  I stamped her with black ink and used the perfect and easy to use "wise die" that fit the witch just perfectly!  I then colored her in with simple colored pencils.
The Card Shape itself is called a "fake gate card" and I learned how to make it from Joy at Obsessed with Scrapbooking. She has all kinds of wonderful tips and hints on her blog. 
I used that adorable Bazzill paper for the base and the trim of the card.
Here is how the card opens and you can see the sentiments I used from this stamp set.
Here is the card completely opened up.  
These three sentiments were all separate and I stacked them on the acrylic stamping block and stamped them all at once.
Aren't the bats cute?


I wanted to decorate the inside as you unfold the card so I added another cute pumpkin from the stamp set!
Don't you just love the patterned paper from Bazzill? I chose the color pencils I used to tie in with the pattern paper.
Not only did I pop the pattern paper up with foam squares, I also mounted the witch on an
Action Wobble so she wiggles!
You can see a bit of the blur in this photo...that is the great action of the Wobble working!
One final look at my card!
I was so happy with the paper I received I decided to throw together another fast and very simple Halloween card. 
I simply layered some of the wonderful Bazzill paper and the sentiment card on the card!
Used foam squares to pop up the layer with the saying.
Couldn't be easier!
I am so happy you stopped by to visit and I hope you are inspired to make some Halloween projects. We would love you to link up your project at our Challenge Blog!

Please make sure your creation post has a link back to Cuttin' and Stampin'

Thanks for playing along we will be announcing the winners on October 11 2013.

You can link your project Here.

I am linking up to:

Photobucket
and also at:

Craftin Desert Divas


Tuesday, September 24, 2013

Use Your Scraps!


Weekly Challenge #38


#38
Challenge:   Use your Scraps
September 24 - 30th, 2013

Hello Crafty Friends!   Today is my Design Team posting day for the Cuttin' and Stampin' Challenge Blog.  This week we are being asked to "Use Our Scraps".  Any of us that do paper crafting always have little bits of paper left over. Do you save them or recycle them or just toss them in the trash? I am a "saver" - especially if it is a "special" paper- a pretty pattern, glitter cardstock,  or a neat texture.  But I really am good at saving any usable size left over pieces of paper and I turn to my scraps first when I am creating, before cutting into a brand new piece of paper!
Today I made a birthday card for a sweet friend that lives in Alaska. (Hi Lori!!) 
 Let's take a look at it and then we'll talk about it!

I used an adorable Paper Smooches Stamp from the set called
"Chubby Chums" set.  I recently purchased some water color pencils and stamped the chick on water color paper and then used the pencils to color her in- then used a water color paint brush dipped in water to blend. I then "fussy cut" around the chick. To create the "nest" she is sitting in, I drew a nest with the water color pencils and then again used the paint brush to help blend the color. I did a light blue watercolor back ground as well for the chickie and the nest to rest on!  
I used foam squares to give the card dimension.


I used another Paper Smooches Stamp for the little flag the chick is holding - from the same stamp set, "Chubby Chums".  I just hand cut a little banner shape.

For the inside sentiment I stamped the "happy birthday" from a super cute set called Sentiment Sampler.  
You can get your very own Paper Smooches stamps from The Cuttin' and Stampin' Challenge Blog. Tammy has some amazing weekly specials going on right HERE! 
I KNOW you have some scraps laying around your craft area!  Please join us in this challenge and enter your own project!

Please make sure your creation post has a link back to Cuttin' and Stampin'

Thanks for playing along we will be announcing the winners on October 4, 2013. 

You can link your project 

Thank you so much for visiting today! I'd love to hear your comments!